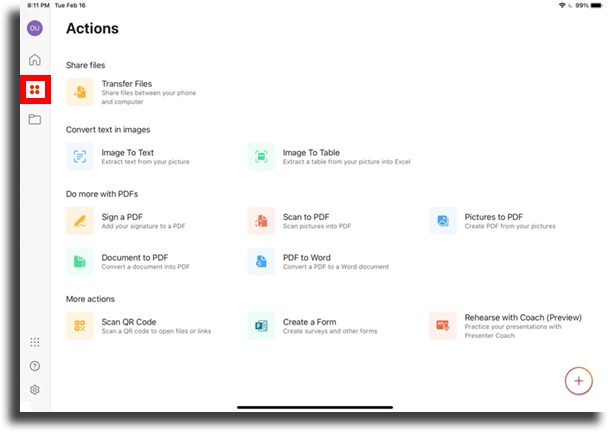
Since 2014, users, technically, could already count on Office features on their iPads and iPhones. However, the program was unable to make use of the full potential of larger-screen devices. The view and appearance ran in windowed mode, becoming very similar to the visual experiences of smartphones and thus, the entire iPad’s larger display was underutilized. But with the optimization for iPadOS – currently at version 2.59.1 – users can benefit from more precise gestures in larger display areas, as well as the full visual and haptic range of the device’s display. In addition, some other interesting features come with the package, such as the possibility to create, edit and sign PDFs and transform images into documents in Microsoft Office with additional features. You’ll also be able to scan QR codes to open links and transfer files wirelessly between iPad and computer, which is great functionality, isn’t it? In this article, we’ll show you how to make the most of these amazing Office features for the iPad and iPhone, as well as other tips that will certainly make your routine easier.
Downloading the Office Suite on iPad
The three main Office apps come in this package that you can download directly from your Apple Store. Word, Excel and PowerPoint, and other tools will be at your disposal to:
Create and edit new Word documents, Excel spreadsheets, or PowerPoint presentations. Quickly jot down thoughts and ideas with Sticky Notes. Instantly create PDF files from photos or existing Word, Excel, and PowerPoint files. Take photos of whiteboards or printed documents and crop, sharpen or straighten them using the built-in functionality of Microsoft Lens. Scan QR codes to easily open linked files or websites.
Once you’ve downloaded it, you can choose whether or not to subscribe to the package to have access to all the app’s features. Without the subscription, you will have access to the features, but you will not be able to create or edit documents.
Amazing features
With Office installed on your iPad, click on the icon on your main screen and open the menu. Click the Actions icon and let’s explore the features:
1. Image To text
Our first tip will help you save time by extracting text from any image, to use wherever you need it. Better than typing all the chosen text, isn’t it? So let’s go through the simple step-by-step of this super resource:
In the Actions menu, click Image to Text; With the camera, take a photo or select an image already saved in your photo album; If necessary, crop the image so that only the text is shown and tap Finish; When the text is converted, tap Copy and then Paste the text where you want to use it; To finish the process you can choose between two options: Share to select an app or service to share the text with Or you can choose to tap X and log out.
2. Image To Table
Another super valuable tip and very similar to the previous tip, will help you extract a table of information from an image and use it in Excel. To do this, do the following:
In the Actions menu, click Image To Table Take a photo with the camera or select an image from your photo album. If necessary, crop the image so that only the table is shown and tap Finish. Tap Open and check for errors that may have occurred during the conversion. Some errors may be marked with the message “Items need your review”. If desired, tap Review or tap Open Anyway to continue without reviewing the content, and the converted table will open in Excel.
TIP: You can change the location where the file was saved by tapping the triple-dot button in the upper right corner.
3. Convert file to PDF
Converting files to PDF is certainly one of the amazing features not only of Office for iPad but also in this current moment we are living. With the increase in home office work and the demands of companies that, with social responsibilities, have considerably reduced the printing of documents over the years, features like this are essential. And, although the Notes app on your iPad already performs this function, this process can also be done by Office and very quickly. Follow the script below, starting from the Actions menu and selecting Document to PDF:
Choose the document, or image, from your OneDrive account or from your iPad or iPhone storage. Tap Edit on the triple-dot button, then tap Save. Enter a name for your file and select Save. If you want to change the location of the file, tap Locations and save the PDF file to the location of your choice.
Remember that, with the application in its basic function, without subscribing to the package, it will not be possible to edit the document, but you will be able to copy the information from the PDF. TIP: Did you know that the Canva app has an edit PDF feature? Well, with it you can change the texts of PDFs in such a simple way that you can even doubt it, want to know more? Take a look at this article where we show you some little secrets of this darling app.
4. Sign a PDF
Still thinking about our much more virtual environments, being able to add your signature to a PDF file is wonderful! Not having to print, sign and then scan a document will certainly make your routine a lot easier. In the Office application, still on the Actions menu, click Sign a PDF and follow the steps below:
Find and open the file you want to sign; Tap where you want to place your signature. If this is your first time using the app, you will need to create your signature, or if you have an Apple Pencil, tap your pen on the screen, and in the notification box create your signature. In the end, tap Done and the signature will appear on your iPad screen. Now correctly position the signature and, if necessary, resize, zooming in or out with the pinching motion of your fingers. If you want to sign elsewhere on the document, tap Sign in other places, then tap your signature.
TIP: To delete a signature, tap where it appears and then tap the Trash button.
5. Transfer files by QR Code
With the Office app, you’ll be able to send files between your iPad and your computer, and vice versa, and best of all: without the need for cables. So to end our list of awesome Office features for iPads and iPhones tips, we are going to show you how to save time by transferring your files via QR code. QR Code means quick response and its main focus is to eliminate some steps in the processes. This two-dimensional version of a barcode leads to a URL address, location, email, phone number, or contact and can be scanned by most smartphones through the camera. To transfer files, follow the process step-by-step:
From the Actions menu select Transfer files; In the window that opens, click on Send or Receive, according to the action you want to take; Now open your computer and web browser and then go to the URL displayed on the iPad screen; A page showing a QR code should now open; On your iPad, point the camera at the QR code on the computer screen, then confirm the code on the computer to complete pairing; Then do one of the following: – If you previously selected Send, select the files you want to send. The selected files will be transferred to your computer. – If you previously selected Receive, click choose files to transfer on your computer or drag and drop the files you want to transfer to this window.Tip: You can check the transfer progress on your iPhone. To transfer additional files, click Choose files to transfer on your computer once more. When you’re done transferring files, close the browser, then tap the back button near the top left corner of the iPhone screen to return to the Home tab. Received files are stored on your iPhone. You can view these files at any time from the Home tab.
In addition to all these amazing features, you can still create Sticky Notes and utilize the features of Microsoft Lens for iOS. With the power of the Office app for iOS, you can stay productive virtually anywhere.
What do you think of the new Office for iPad and iPhone and its amazing features?

